Adding Custom Formats to the WordPress WYSIWYG Editor
by Utsab Karki, Senior WordPress Developer
Insights / Website Development /

Photo by Rogério Martins via Pexels
The traditional WordPress editor, developed by TinyMCE, is nicknamed WYSIWYG – what you see is what you get. As the name suggests, anything entered into the editor can be expected to look the same when published on the front-end of the website as well.
The WordPress WYSIWYG editor is a powerful tool on its own, allowing users to format content, including making text bold or italicized, creating unordered or ordered lists, using different heading levels, adding links, and controlling the text alignment. It also provides additional formatting options whose view can be toggled (please refer to this article for more information on toggling the additional options).
In addition to the default options, the TinyMCE WYSIWYG provides an API through which custom styles can be defined and can be used to format content.
When we’re developing a new website, we often need to create custom styles to be used on certain elements, such as buttons.
Using the Editor to Apply CSS Classes
Buttons are usually just standard links with a certain CSS class applied to them so they render as a button.
While you could use the “Text” view in the WordPress editor to add your HTML or CSS classes by hand, we prefer to make it easier to transform a link into a button. We do this through the “Formats” dropdown in the WYSIWYG editor, using a couple of filters provided by WordPress.
Let’s assume that we have a .btn class, which – when added – displays links as buttons. Before we can add this as an option to the editor, we have to activate the styleselect dropdown menu by filtering the array of buttons loaded.
// Callback function to insert 'styleselect' into the $buttons array
add_filter( 'mce_buttons_2', 'dgtlnk_mce_buttons' );
function dgtlnk_mce_buttons( $buttons ) {
     array_unshift( $buttons, 'styleselect' );
     return $buttons;
}
In the above code, which can be added to your functions.php file, we use the mce_buttons_2 filter to insert ‘styleselect’ into the $buttons array for the WYSIWYG. Then we can add the following code, which populates the “Formats” dropdown with an option to create a button.
// Callback function to filter the MCE settings
add_filter( 'tiny_mce_before_init', 'dgtlnk_mce_before_init_insert_formats' );
function dgtlnk_mce_before_init_insert_formats( $init_array ) {
     // Define the style_formats array
     $style_formats = array(
          // Each array child is a format with it's own settings
          array(
               'title' => 'Create Button',
               'selector' => 'a',
               'classes' => 'btn',
          ),
     );
     // Insert the array, JSON ENCODED, into 'style_formats'
     $init_array['style_formats'] = json_encode( $style_formats );
     return $init_array;
}
In the above code, we use the tiny_mce_before_init filter to insert an array of formats into the $style_formats array. Each array inside the $style_formats array has a ‘title’, the displayed name for the format, a ‘selector’ to limit the styles to certain HTML tags and ‘classes’, which is the class appended to the selected content.
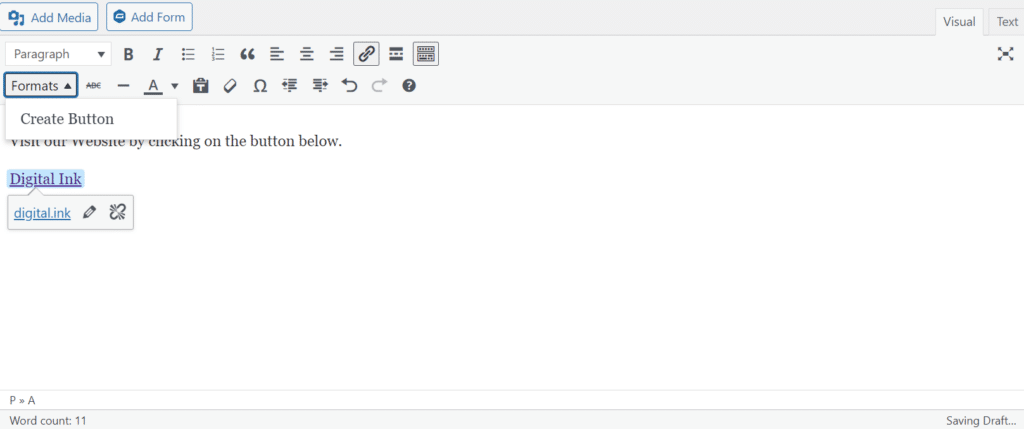
After adding the above code, you’ll see that a “Formats” dropdown is available in the WYSIWYG editor with the “Create Button” option. The option can only be selected when a link is highlighted in the WYSIWYG editor; click it, and it adds the .btn class to the link. This can be verified by viewing the raw HTML code.
Adding the Styles to the WYSIWYG Editor
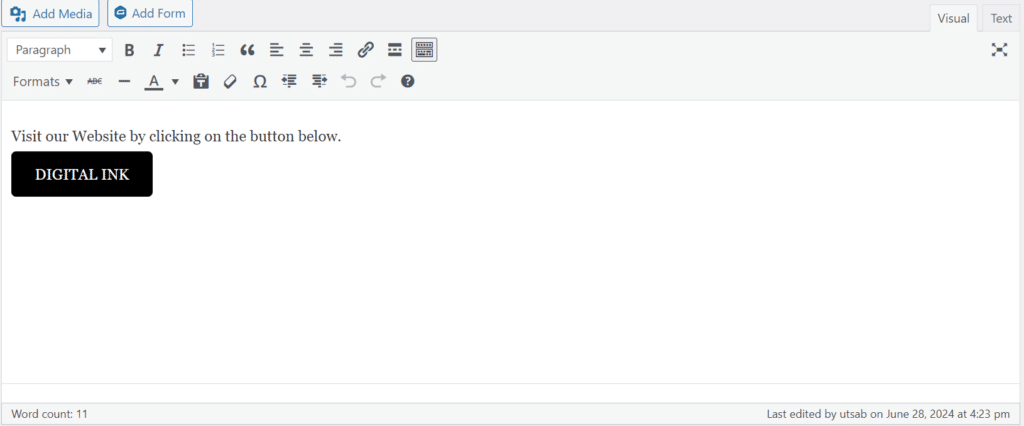
Although the class is added to the link, there is no visual representation confirming that the class has been added. In order to give a visual representation, we will have to add some styles for the .btn class, which can be done by adding styles to the ‘content_styles’ index of the $init_array.
$init_array['content_style'] .= ".btn { background-color: #000000; color: #ffffff; border-radius: 5px; padding: 15px 25px; text-transform: uppercase; text-decoration: none;}";The above code can be added to the dgtlnk_mce_before_init_insert_formats function right after the $init_array['style_formats'] = json_encode( $style_formats ); line. Now, when the “Create Button” option is applied to a link, we can visually see that the link has been transformed to a button.
Further customization options for the WYSIWYG editor are also available and can be viewed on the WordPress codex page or on the TinyMCE website.
Adding custom formats to the WYSIWYG editor gives you the ability to add any type of content and have it styled correctly without having the need to learn HTML and CSS. If you would like to extend your WYSIWYG editor on your website or for any other digital marketing needs, reach out to us.
About Utsab Karki
Utsab Karki is the Senior WordPress Developer at Digital Ink. He builds new websites, manages functionality requests and changes, and makes clients' sites run better. Digital Ink tells stories for forward-thinking businesses, mission-driven organizations, and marketing and technology agencies in need of a creative and digital partner.
Other Stories You May Like